GridPix - Stretch images across many flipping cubes in JavaScript
TL;DR
I wanted to learn some things about Javascript so I built GridPix on top of HexaFlip. GridPix is a toy/work-in-progress, but here is an example.
<link href="https://foote.pub/scripts/hexaflip.css" rel="stylesheet" type="text/css">

<div id="tldr" align="center"></div>

<script src="https://foote.pub/scripts/hexaflip.js"></script>
<script src="https://foote.pub/scripts/gridpix.js"></script>

<script>
var images = [
                'https://foote.pub/images/pie1.jpeg',
                'https://foote.pub/images/pie2.jpeg',
                'https://foote.pub/images/pie3.jpeg',
                'https://foote.pub/images/pie4.jpeg'
            ];
var gp = new GridPix(document.getElementById('tldr'), images, null, true);
</script>
You can find more examples here and here.
Why
I’m going to be starting a new job soon that will drop me in the deep technical end of the software security consulting pool. I’ve spent the majority of my time recently working in low-level user space, and my new job promises to be a lot more dynamic. When I saw Dan Motzenbeckers’s OriDomi bubble to the HackerNews front page I thought 1) this is cool 2) the code seems well-written and 2) this is completely beyond me. After browsing through his projects I found another project called HexaFlip (github project) that also triggered the same response, but gave me an idea for something to build onto it. So I decided to write some code to refresh my javascript reading, editing, and hacking skills, which are quite rusty. The result is a work-in-progress you can find on GitHub as GridPix.
Background
HexaFlip is a pure-javascript “plugin” library that allows a developer to create infinitely-sided spinning cubes that can be faced with text, colors, or images. There is a good summary of HexaFlip as well as some demos on the project page, and a helpful discussion of the internals written by Dan here. If you have Javascript enabled, here is a flippable Hexaflip cube:
NOTE
HexaFlip (and subsequently, GridPix) work best with Chrome and Safari. Both libraries work especially poorly in Firefox – clicking cubes generally sticks, sometimes faces of cubes don’t appear, etc.
This is probably an appropriate time to note that this post won’t be very fun if you have Javascript disabled. Anyway, here is the code that generated the HexaFlip above:
<link href="https://foote.pub/scripts/hexaflip.css" rel="stylesheet" type="text/css">
<div id="hexaflip-example" align="center"></div>
<script src="https://foote.pub/scripts/hexaflip.js"></script>
<script>
var hf = new HexaFlip(document.getElementById("hexaflip-example"),
  {0: [{value: 'fight', style: { backgroundColor: 'green' } },
       {value: 'to', style: { backgroundColor: 'red' } },
       {value: 'live', style: { backgroundColor: 'black' } },
       {value: 'to', style: { backgroundColor: 'pink' } }
  ]}
);
</script>
Setting Some Goals
The details of my goals evolved as I worked through this, but from the outset I wanted to define an easy way to do a few things with HexaFlip:
- Create a set of HexaFlips that would display a single image across themselves, in a tiled or mosaic style
- Define a way to snap all of the HexaFlips in the aforementioned set to the same image once they have been rotated away
- Create a bunch of small HexaFlips that would automatically flip as I moused-over them
These goals are a bit arbitrary, but I thought the result might be fun to play with. I also thought that my toddler might get a kick out of it if I loaded up the resulting code with pictures of our family, shapes, etc.
Flipping on mouseover
HexaFlip’s README advertises simple ways to flip a cube:
myHexaFlip.flip()
And add mouse events:
//...
    },
    {
        domEvents: {
            mouseover: function(e, face, cube) {
                face.style.backgroundColor = 'red';
            },
        }
    }
);
Unfortunately DOM events weren’t working when I first tried them, but I was able to find and fix the bug, and Dan ended up merging the result back into the HexaFlip master branch. Anyway, flipping on mouseover didn’t give the desired effect. The mouseover event callback function is attached to each face of the cube, so as the club flips the event keeps firing. Here is an example; try moving your cursor up-and-down toward the middle of the cube (while keeping the cursor over the cube).
Attaching to the mouseout event is a little better. The flip-fiesta problem still happens, but it is less likely to trigger because the user’s mouse is usually outside of the cube during the flip. To trigger the issue in the example below, just move your cursor onto the cube, off of the cube, and then back into the cube quickly.
I looked into disabling mouse events for the duration of the flip, but I couldn’t figure out an easy way to attach a callback on flip completion (flipping seems to be handled largely by tweening in CSS). So, I considered this good enough for this exercise.
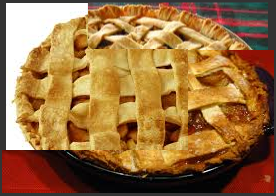
Stretching an image across HexaFlips
My goal here was to have each face of a set of HexaFlip cubes display a stretched image. This creates a kind of tile or mosaic effect where the user can flip each HexaFlip to show a partial view of the next (or previous) image in the set. Here is how single images are usually displayed in HexaFlips:
The code for creating this cube is below. Note that the list of image URIs used to populate the HexaFlip passed in as an array.
<div align="center">
<div id="pie-flip" align="center"></div>
</div>
<script>
var hf = new HexaFlip(document.getElementById("pie-flip"),
  {
    set:
      ['https://foote.pub/images/pie1.jpeg',
       'https://foote.pub/images/pie2.jpeg',
       'https://foote.pub/images/pie3.jpeg',
       'https://foote.pub/images/pie4.jpeg',
       'https://foote.pub/images/pie5.jpeg']
  },
  {
    size: 200
  }
);
</script>
So my rough plan for getting an image to display across multiple HexaFlips was as follows:
- Calculate the maximum width and height of the images in the set
- Based on a supplied cube-side length (or number of cubes) and the maximum dimensions of the image, create a grid of cubes that is big enough to display each of the images
- For each grid in the cube, use the image dimensions, cube dimensions, and cube position to calculate the number of pixels we would need to offset each image to align the image with the others in the grid
- Apply the offsets
Getting maximum image dimensions
We can get the dimensions of an image from Javascript code by
- Loading the image, like this: image = new Image(); image.src = “my/uri.jpg”;
- Waiting for the image load to complete
- Grabbing the dimensions, like this: width = image.width; height = image.height;
The cool thing is that in most implementations of Javascript, once you load the image for a web page, it will be cached so that future loads are fast. So, after some tinkering, I came up with a maybe-clever (or maybe-reinvented) re-usable chunk of code that invokes a callback function when a supplied list of images have been loaded:
function onImagesLoaded(imageUris, callback) {
  /*
  Calls callback when all images in imageUris have been loaded.
  */

  var imagesRemaining = imageUris.length;
  function countDown() {
    /*
    Decrement number of images; if number is zero, invoke callback.
    */
    imagesRemaining--;
    if (imagesRemaining == 0) {
      callback();
    }
  }

  // Load images; set countDown function to be called when load is complete.
  for (var i = 0; i < imageUris.length; i++) {
    var image = new Image();
    image.onload = countDown;
    image.src = imageUris[i];
  }
}
So I simply pass my maximum-dimension-calculating code to this function as the callback parameter. As an a side effect the images will be pre-loaded for the HexaFlip instances I’ll eventually use to display the images, so using this technique shouldn’t create too much of a burden for the browser.
Applying the offsets
Steps 2 and 3 above are straightforward, so I’ll fast-forward to applying the offsets. My initial approach was to loop through all of the faces (div objects) of each HexaFlip and adjust the backgroundPosition style attribute, respectively. This worked well enough initially, but eventually I wanted the images to be centered in this grid – this required knowing the exact dimensions of the image that is currently display on the face. Part of the magic that makes HexaFlip work is quietly switching which image appears on which face div object on the faces that the user can’t see. So, I wasn’t able to simply apply a uniform offset to each cube.
I was about to give up on centering the image when I came across this code in HexaFlip’s _setContent function:
  if (typeof content === 'object') {
    style = content.style, value = content.value;
    for (key in style) {
      val = style[key];
      el.style[key] = val;
    }
  } else {
    value = content;
  }
  if (urlRx.test(value)) {
    el.innerHTML = '';
    return el.style.backgroundImage = "url('" + value + "')";
  }
So, if we create a Javascript Object that has a style attribute and the image URI as the value attribute, it turns out HexaFlip will apply those attributes for us. So I was able to simply associate the background position with the image in my cube-creation loop to create the desired effect. Note that x and y below refer to the x and y position of the current cube in the grid; they are iterators in the loops that contain this logic. gridLength is the length of the side of the grid, in pixels.
    // Here we create an array of Objects that will cause the HexaFlip code
    // to display our images with the proper offsets on each face of the cube (giving
    // the appearance of a centered image
    var positionedImages = [];
    for(var i = 0; i < imageUris.length; i++) {
      var posImage = new Object();
      posImage.value = imageUris[i]; // HexaFlip will read this as a URI
      posImage.style = new Object();
      xPos = -(x - (gridLength - images[i].width)/2)
      yPos = -(y - (gridLength  - images[i].height)/2)
      posImage.style.backgroundPosition = xPos + "px " + yPos + "px";
      posImage.style.backgroundSize = "auto";
      posImage.style.backgroundRepeat = "no-repeat";
      positionedImages.push(posImage);
    }
I then simply pass the positionedImages array to the HexaFlip constructor for the current cube to create the object. Here is an example of what this can do:
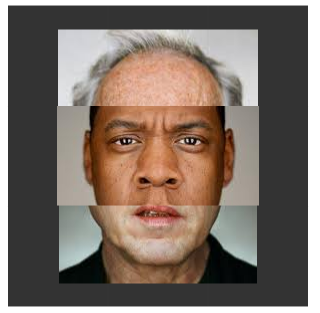
… and here is the code used to create that example:
<link href="https://foote.pub/scripts/hexaflip.css" rel="stylesheet" type="text/css">

<div id="portraits" align="center"></div>

<script src="https://foote.pub/scripts/hexaflip.js"></script>
<script src="https://foote.pub/scripts/gridpix.js"></script>

<script>
var images = [
                'https://foote.pub/images/nicholson.jpg',
                'https://foote.pub/images/jackson.jpg',
                'https://foote.pub/images/eastwood.jpg',
                'https://foote.pub/images/walken.jpg',
                'https://foote.pub/images/jayz.jpg',
            ];
var gp = new GridPix(document.getElementById('portraits'), images, null, true);
</script>
Snapping the grid to an image
With the infrastructure above in place, it was relatively straightforward to add logic for snapping the faces of the cubes to the same image. Here is the guts of the logic:
    // Define a seek callback function to use with HexaFlip instances.
    function flipSeek(e, face, cube) {
      /*
      Flips all of the window.hexaFlips to the position of this cube.
      Designed to be used as a DOM event callback for a HexaFlip instance.
      */
      for(var i = 0; i < window.hexaFlips.length; i++) {
        var hf_i = window.hexaFlips[i];
        while(hf_i.cubes.set.last != this.cubes.set.last) {
          if (hf_i.cubes.set.last > this.cubes.set.last) {
            hf_i.flipBack();
          } else {
            hf_i.flip();
          }
        }
      }
    }
This actually works in the portrait example mentioned above; give it a shot!
Many small cubes. So amaze.
Creating a lot of small HexaFlips (at least the way I’m doing it) turns out to bog down the browser. Check out an example here.
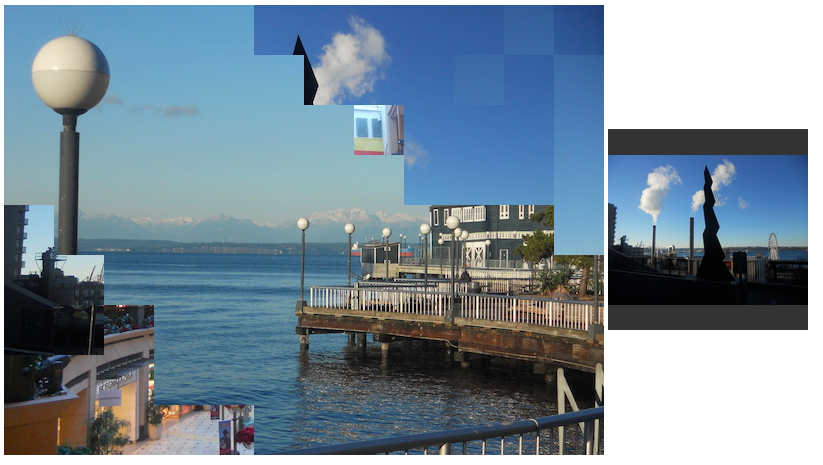
I noticed that it was kind of difficult to make out which image you are looking at with the small cubes, so I added an optional picker to the right – you can spin this picker using the default click-and-drag style for HexaFlips, and double-clicking it will rearrange the grid to match. The code that accomplishes this looks like this:
<table border="0">
<tr><td>
<div id="sea" align="center"></div>
</td><td>
<div id="sea-picker"></div>
</tr></table>

    <link href="scripts/hexaflip.css" rel="stylesheet" type="text/css">

    <script src="scripts/hexaflip.js"></script>
    <script src="scripts/gridpix.js"></script>

<script>
var images = [
                'https://foote.pub/images/sea1.jpg',
                'https://foote.pub/images/sea2.jpg',
                'https://foote.pub/images/sea3.jpg',
                'https://foote.pub/images/sea5.jpg'
            ];
var gp = new GridPix(document.getElementById('sea'), images, 50, true,
  document.getElementById('sea-picker'), 100);
</script>
The Interface
Here is a listing of GridPix’s arguments:
function GridPix(el, imageUris, cubePx, mouseOutFlip, pickerEl, pickerPx) {
  /*
  Creates a GridPix object to display 'imageUris' array of image URIs on element 'el'.
  The cubes that make up the grid will have sides of length 'cubePx' (default is 100).
  If 'mouseOutFlip' is true, cubes will flip on mouseout (default is false).
  If 'pickerEl' is set to a document element, the element will display the entire image and
  flip the grid when double-clicked (default is null/no picker).
  If 'pickerEl' is defined, the picker will be a cube with a side length of 'pickerPx'
  (default is 'cubePx').
  */
Ideally GridPix would be a bit more flexible – at a minimum it should allow the user to apply all of HexaFlip’s options via the function call. It should also check some more edge cases and fail gracefully. But, for now it is a learning toy; the source code should be simple enough to edit if you have a reason to use or extend it.
Reflection
Overall I found building a widget on top of HexaFlip to be a good warm-up/refresher exercise. Dan’s code is a great baseline to start from. As usual, actually sitting down and coding a (semi-) complete module in a new environment has been a valuable experience. I’ve also gained an additional appreciation for web GUI programmers – making widgets, layouts, etc. appear and function uniformly across browsers and configurations seems like it would be extremely tedious work!
Thanks for reading. If you have any questions or comments feel free to drop me a line.